Table of Contents
ToggleA clogged or matted roller brush is one of the most common reasons a Shark vacuum loses suction. Whether you’re dealing with tangled hair, pet fur, or packed-in dust, removing and cleaning the roller brush is straightforward and takes only a few minutes. This guide walks you through the entire process, from locating the release mechanisms to reinstalling the brush, so you can get your vacuum running at peak performance again. Most homeowners can complete this task without special tools or professional help.
Key Takeaways
- A clogged roller brush is the most common cause of suction loss in Shark vacuums, and removing it takes only 20–30 minutes without special tools or skills.
- Remove wrapped hair and fibers using scissors or a craft knife, then wash the brush bristles with warm soapy water and allow at least 2 hours for complete air-drying before reinstallation.
- Inspect your Shark vacuum’s roller brush monthly and deep-clean every 3–6 months to prevent permanent bristle damage and extend the brush’s lifespan.
- Always unplug the vacuum before removing the roller brush, and listen for smooth operation during a 10–15 second test spin after reinstalling to ensure proper seating.
- Check the brush support brackets and compartment for debris, cracks, or bent arms during removal to catch damage early and prevent costly motor issues.
Why You Should Regularly Remove and Clean Your Roller Brush
The roller brush (also called the main brush or beater bar) spins hundreds of times per minute to agitate carpet fibers and loosen embedded dirt. Over time, hair, lint, and debris wrap tightly around the bristles, restricting its rotation and severely cutting suction power. A sluggish or non-spinning roller brush signals that buildup has reached a critical point.
Regular cleaning prevents this bottleneck. Most manufacturers recommend inspecting the roller brush monthly and deep-cleaning it every 3 to 6 months, depending on household traffic and pet presence. If you have long-haired pets or family members, aim for monthly maintenance. Beyond restoring suction, a clean brush lasts longer, matted bristles stiffen permanently and wear out faster, forcing premature replacement.
Removal and cleaning also gives you a chance to spot damage: cracked bristles, a wobbling or bent shaft, or rubber pieces flaking off. Catching these early keeps your vacuum reliable and prevents debris from entering the motor housing.
Tools and Supplies You’ll Need
Shark vacuum designs vary slightly by model, but the removal process stays consistent. Gather these items before you start:
Tools:
• Flathead screwdriver (for release latches or screws)
• Scissors or small craft knife (to cut tangled hair and fiber)
• Pair of tweezers or fine-tooth comb (optional, for stubborn lint removal)
Supplies:
• Soft brush or old toothbrush (for bristle cleaning)
• Warm water and mild dish soap
• Dry cloth or paper towels
• Vacuum bag or trash bin (for collected debris)
Safety:
• Unplug the vacuum from the outlet before beginning any work. Never work on a plugged-in appliance, even if the power switch is off.
You likely have most of these items at home already. No special or expensive supplies are required. Keep a small scissors dedicated to vacuum maintenance rather than using kitchen shears, this task dulls blades quickly.
Step-by-Step Removal Process
Step 1: Unplug and Position the Vacuum
Always unplug the vacuum at the wall outlet. Place the unit upside down on a flat work surface, a table, garage floor, or yard area works well. Lay down newspaper or a drop cloth to catch loose debris.
Step 2: Locate the Brush Release Mechanism
Flip the vacuum over. You’ll see the roller brush compartment on the underside. Most Shark models use one of two designs: a release latch or a series of screws securing the brush cover. Check your model’s underside for a red, blue, or black lever-style latch near the edges of the brush compartment. If your model uses screws instead, grab your flathead screwdriver, typically two to four screws hold the cover in place.
Step 3: Release or Unscrew the Cover
If your vacuum has a latch, push or twist it firmly in the direction the arrow indicates (usually outward or downward). The brush cover should release cleanly. If using screws, turn them counterclockwise and set them somewhere safe, a small dish or cup prevents loss. Remove the cover gently: it may harbor loose debris.
Step 4: Disengage the Brush
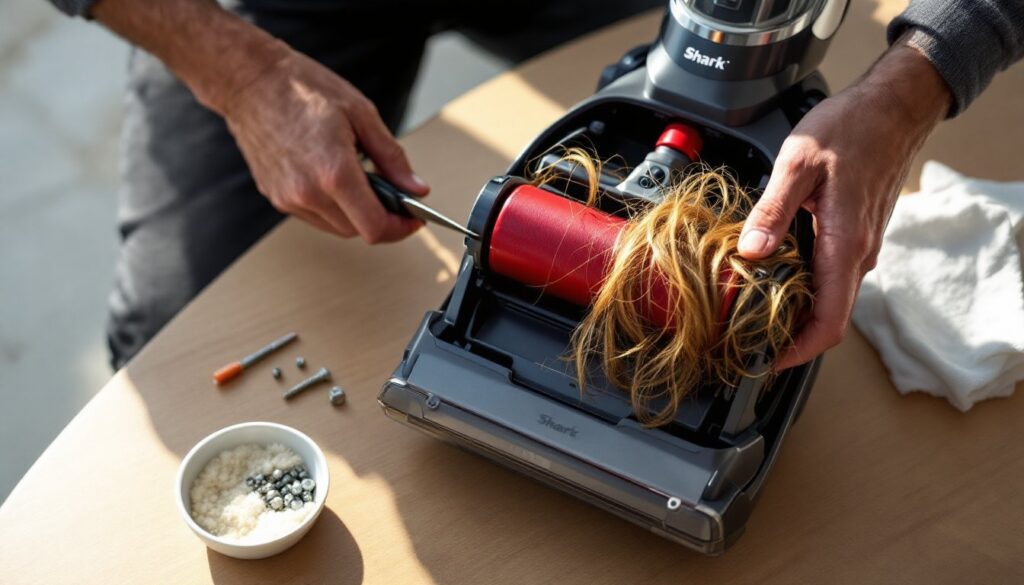
Under the cover, you’ll see the roller brush sitting in a curved channel with support arms on both ends. The brush doesn’t screw on: it rests on these supports. To remove it, grasp the brush firmly at one end and lift it slightly upward and toward you. It should pop free from the support brackets. If it resists, wiggle gently side to side while lifting, never force it, as the support arms can bend.
Step 5: Inspect the Compartment
With the brush removed, take a moment to check the underside compartment and supports. Clear any loose lint, debris, or clumps using your hand or a small brush. This prevents recontamination when you reinstall the brush.
Cleaning and Maintaining Your Roller Brush
Now that the brush is out, it’s time to restore it to working condition.
Remove Wrapped Hair and Fibers
Use scissors to cut away any hair or fiber wound around the bristles. Work along the length of the brush, cutting in the direction of the bristles to avoid damage. If the mess is heavy, use your craft knife to gently scrape along the brush barrel, angle the blade parallel to the bristles. This task requires patience but makes a huge difference. For stubborn, woven-in lint, a fine-tooth comb run lengthwise can pluck out embedded fibers. Wrap collected hair in a paper towel and discard.
Wash the Bristles
Fill a sink or bucket with warm water and add two drops of mild dish soap. Submerge the brush and let it soak for 2 to 3 minutes to loosen dust. Use an old toothbrush or soft brush to scrub the bristles gently in all directions. Pay extra attention to the base of the bristles where fine dust hides. Rinse thoroughly under running water until the water runs clear. Shake off excess water and stand the brush upright (bristles up) on a towel to air-dry completely, at least 2 hours, ideally overnight. Never reinstall a damp brush: trapped moisture can damage the motor bearings.
Check for Damage
While the brush dries, inspect it for cracks, missing bristles, or a warped barrel. Minor bristle loss is normal, but widespread damage or visible cracks mean replacement is due. Also check the support brackets inside the compartment for cracks or bent arms that could prevent proper seating.
How to Reinstall the Roller Brush Correctly
Once the brush is completely dry, reinstallation is the reverse of removal.
Align and Insert the Brush
Hold the dry roller brush at both ends and position it above the support brackets. The brush sits in a curved channel, align the brush barrel with that channel so both ends rest squarely on the support arms. Lower the brush gently until it settles fully into the brackets. It should sit snugly without rocking side to side. If one end feels loose, lift and reposition the brush until it seats evenly.
Reattach the Cover
Align the brush cover over the compartment. If your model uses latches, slide or twist them back to their locked position until you hear or feel a click. The cover should sit flush against the vacuum body with no gaps. If your model uses screws, insert them and turn clockwise until snug, don’t over-tighten, as this can strip the plastic. When installed correctly, the brush compartment cover will feel secure and aligned with the rest of the underside.
Test Before Full Use
Plug the vacuum back in and flip it right-side up. Turn it on for 10 to 15 seconds and listen for smooth operation. The brush should spin freely without rattling or grinding sounds. If you hear grinding or the brush doesn’t spin at all, stop immediately, unplug, and double-check that the brush is fully seated and the cover is properly fastened. With home maintenance checklists guiding regular upkeep, small adjustments like this catch problems before they become costly repairs.
Once satisfied, you’re ready to vacuum normally. Your restored suction power will be noticeable right away.
Conclusion
Removing and cleaning your Shark vacuum’s roller brush is a simple maintenance task that takes 20 to 30 minutes and requires no special skills or expensive tools. By committing to this routine every few months, you’ll maintain peak suction, extend brush life, and keep your vacuum running reliably. If you spot damage or the brush refuses to spin smoothly after reinstallation, replacement brushes are inexpensive and widely available online and in-store. Regular attention to this one component pays dividends in performance and longevity.